
The post Wonderfox Coupon Code 2025 appeared first on free product key.
]]>1. Coupon Code: L5Q9HY
Discount: Get $5 off on WonderFox
2. Coupon Code: VCF20D
Discount: Get 20% off on WonderFox
Valid Until: No Expires
🎬 WonderFox HD Video Converter Factory Pro
- L5Q9HY
- VCF20D
📀 WonderFox DVD Ripper Pro
- L5Q9HY
- VCF20D
📄 WonderFox Document Manager
- L5Q9HY
- VCF20D
🛍️ Bundle Deals
- 64% Off: HD Video Converter Factory Pro + DVD Ripper Pro bundle for $24.95
- 90% Off: DVD Video Converter (1 Year/1PC) for $11.96
💡 Tips for Maximum Savings
- Subscribe to Newsletters: Stay updated on exclusive discounts and promotions.
- Check for Special Sales: Look out for sales events during holidays and special occasions.
- Use Promo Codes: Regularly check for updated promo codes to ensure you get the best deals.
- Bundle Products: Take advantage of bundle deals that combine multiple products at a reduced price.
The post Wonderfox Coupon Code 2025 appeared first on free product key.
]]>The post How to Add Music to an Instagram Post appeared first on free product key.
]]>
1. Add Music to Instagram Stories
Instagram Stories allow you to add music directly through the app:
Steps:
- Open Instagram and tap the “+” icon at the top or swipe right from the feed to open the Story camera.
- Take a photo, record a video, or select one from your gallery.
- Tap the sticker icon at the top.
- Select the “Music” sticker.
- Search for a song or browse trending tracks.
- Tap the song to preview it and choose the section you want (15 seconds max).
- Customize the display (lyrics, album art, etc.).
- Tap “Done”, then share your Story.
2. Add Music to Instagram Reels
Reels are perfect for syncing short-form video content with music:
Steps:
- Tap the “+” and select “Reel”.
- Tap the music note icon on the left-hand menu.
- Browse or search for a song.
- Choose the part of the song you want to use.
- Record or upload a video.
- Use additional features like text, effects, and stickers.
- Tap “Next” and share your Reel to your feed or Reels tab.
3. Add Music to a Regular Instagram Post (Feed Post)
Instagram does not support adding music directly to photo posts in the traditional feed. However, there are two workarounds:
Option 1: Convert to a Reel
Instagram allows you to post a photo with music as a Reel, which behaves similarly to a regular post.
- Tap “+”, select Reel.
- Choose a photo (or a series of photos).
- Tap the music icon, add your desired song.
- Set the duration and visual style.
- Post as a Reel, and optionally share to your feed.
Option 2: Add Music to Video Before Uploading
If you’re uploading a video post:
- Use a third-party video editor (like InShot, CapCut, or Adobe Rush) to add your desired music.
- Save the edited video to your phone.
- Open Instagram, select Post, and upload the edited video.
- Complete your caption and tags, then share.
⚠️ Note: Make sure the music you’re adding complies with copyright rules if it’s not sourced from Instagram’s own library.
Tips for Choosing the Right Music
- Match the mood of your content (funny, emotional, informative, etc.).
- Use trending songs to increase visibility.
- For brands or creators, consider royalty-free or original music for safety and consistency.
Final Thoughts
While Instagram offers built-in tools to add music to Stories and Reels, adding music to standard feed posts may require a bit of creativity. Whether you’re a casual user, influencer, or small business, music can be a powerful tool to enhance your Instagram presence.
The post How to Add Music to an Instagram Post appeared first on free product key.
]]>The post Best iCloud Remover to Bypass Activation Lock Without Apple ID appeared first on free product key.
]]>Activation Lock protects your device from theft by linking it to the original Apple ID and preventing unauthorized access, even after a factory reset. While it’s excellent for security, it can be a nightmare if you’re the rightful owner but lack the original Apple ID credentials. Fortunately, a reliable solution is Dr.Fone iPhone Unlocker, the best iCloud remover that helps you bypass Activation Lock without needing the original Apple ID.
This article will explain everything you need to know about Activation Lock and show how Dr.Fone can help you regain access to your iPhone safely and effectively.
Navigation:
Part 1: What Is Activation Lock & Why Is It So Hard to Bypass?
Part 2: The Best iCloud Remover – Dr.Fone (Why It Works)
Part 3: Other Methods (And Why They’re Risky or Ineffective)
Part 4: How to Avoid Buying an iCloud-Locked iPhone
Part 1: What Is Activation Lock & Why Is It So Hard to Bypass?
Activation Lock is part of Apple’s Find My iPhone security framework. Once enabled, it automatically activates when you turn on Find My iPhone and tie your device to your Apple ID. This lock survives even a factory reset, requiring the Apple ID and password to reactivate the device.

Why is this a problem?
- Purchased a second-hand locked iPhone:
Many buyers find their newly purchased device stuck behind an Activation Lock because the previous owner forgot to remove their Apple ID. - Forgot Apple ID after resetting the device:
You’ll be locked out if you reset your device but can’t remember your Apple ID credentials. - Inherited a device:
Sometimes, devices passed down from family members or friends remain linked to the previous owner’s account.
This security measure is robust to protect against theft, but it can be frustrating for legitimate users without access to the original Apple ID credentials.
Part 2: The Best iCloud Remover – Dr.Fone (Why It Works)
Wondershare Dr.Fone is a trusted, robust solution to bypass iCloud Activation Lock and remove Apple ID from iPhones without requiring the original password.
Key Advantages of Dr.Fone – Screen Unlock (iOS)
Here’s why it’s highly recommended:
- Remove all lock screens on iPhone, iPad, and iPod touch.
- Bypass iCloud Activation Lock and Apple ID without needing a password.
- Bypass MDM and Screen Time restrictions without losing any data.
- Fully compatible with iOS 18, iPadOS 18, and the iPhone 16 series.
- Easy 3-step process—no technical skills required.
Step-by-Step Guide to Bypass the Activation Lock with Dr.Fone
Using Dr.Fone to bypass the Activation Lock is straightforward. Here’s the general process:
Step 1: Launch the Tool and Choose “Screen Unlock”
Open Dr.Fone and select “Screen Unlock” from the main dashboard.
Then click on “Remove Apple ID” or “Bypass Activation Lock”, depending on your device status.

Step 2: Connect Your iPhone and Start Unlocking
Connect your iPhone or iPad to the computer. The software will detect the connection and show the device’s status. Click Unlock Now to begin.
Step 3: Confirm Screen Lock Status and Two-Factor Authentication
The program will ask if your device has a screen lock enabled. Confirm by selecting Yes to proceed. Make sure your device has a screen lock before continuing. Next, you will be asked if Two-Factor Authentication is enabled on your device.

Step 4: Put Your Device in Recovery Mode
Follow the on-screen instructions to put your device into Recovery Mode according to your iOS model.

Step 5: Download and Verify Firmware
After the firmware download is complete, Dr.Fone iPhone unlocker will verify the file. Once verified, click Unlock Now to continue removing the Apple ID.
Step 6: Completion
When the process finishes, a message will confirm that the Apple ID has been successfully removed. Click Done to exit. Repeat the procedure using the Try Again option if the unlock is unsuccessful.

Part 3: Other Methods And Why They’re Risky or Ineffective
Some users consider alternative ways to bypass Activation Lock, but these can be risky or ineffective:
- Apple’s Official Unlock Process:
Requires proof of purchase and original owner cooperation, which can take a long time.
- Third-Party IMEI Unlock Services:
Many are scams or use illegal methods that may blacklist your device permanently.
- Jailbreaking:
Voids warranty, introduces security risks, and often fails to remove iCloud locks entirely.
Part 4: How to Avoid Buying an iCloud-Locked iPhone
Before buying a second-hand Apple device, always:
Check Settings > Apple ID > Find My Iphone to ensure the Activation Lock is off.
Use Apple’s Activation Lock status checker to verify the device’s status.
Ask the seller to remove their Apple ID before making a purchase.
If you end up with a locked device and cannot contact the seller, Dr.Fone offers a trusted solution to regain control.
Final Thoughts
Apple’s Activation Lock is essential for security, but it can cause significant issues when you don’t have the original Apple ID credentials. Wondershare Dr.Fone is the best iCloud remover, providing a straightforward and safe method to bypass the Activation Lock, remove Apple ID from your iPhone, and unlock your device without losing data.
Whether dealing with forgotten credentials, inherited devices, or second-hand purchases, Dr.Fone is the professional, easy-to-use solution to regain full access to your iPhone, iPad, or iPod touch.
The post Best iCloud Remover to Bypass Activation Lock Without Apple ID appeared first on free product key.
]]>The post AI Agents Revolutionize Online Shopping with Virtual Try-On and Smart Bargaining appeared first on free product key.
]]>The evolution from generative AI (GenAI) to autonomous AI agents marks a significant shift in how users interact with online retailers. These agents aren’t just passive assistants. They are proactive digital shoppers with the ability to analyze preferences, perform tasks independently, and even make complex decisions on behalf of users.
“This is essentially the next step in the evolution of the shopping experience,” said Angelo Zino, analyst at CFRA Research.

Google Leads with AI-Powered Shopping Experience
At the forefront of this shift, Google recently unveiled an AI shopping mode that allows users to upload a photo and see how they’d look in outfits found online. The system intelligently adjusts clothing size and visual details like fabric folds, offering a near-realistic virtual fitting experience.
Once users choose their desired items, they can input the price they’re willing to pay. The AI agent then searches the internet for matching deals and notifies the shopper when one is found—offering the option to complete the purchase using Google’s integrated payment system.
“They’re competing inch-by-inch with Amazon,” commented Avi Greengart, analyst at Techsponential.
Competitors Join the Race
OpenAI, not far behind, has integrated shopping into ChatGPT, enabling it to suggest products, provide consumer reviews, and link directly to retailer websites. AI startup Perplexity also allows users to complete purchases without leaving its app.
Amazon, the world’s largest online retailer, introduced a “Buy for Me” feature in its AI assistant Rufus earlier this year, empowering users to shop across non-Amazon platforms using simple commands.
Walmart is also entering the AI race. Hari Vasudev, Walmart’s Chief Technology Officer, confirmed that the company is embedding AI agents into its online portal and working with partners to ensure its products are prioritized in AI-powered discovery systems.
Meanwhile, Visa and Mastercard have upgraded their systems to support AI-driven payments, preparing for a future where digital agents may soon handle a majority of online transactions.
Redefining the Retail Game
The rise of AI agents introduces a new type of consumer: the machine shopper. Retailers now face a unique challenge—optimizing their offerings not just for humans, but for intelligent systems making decisions on their behalf.
“Retailers will need to understand what appeals to AI agents, not just human buyers,” said Elise Watson, consultant at Clarkston Consulting.
Despite concerns about disruption, Zino believes AI shopping won’t upend the retail space overnight. However, he sees a distinct advantage for companies like Google and Meta, thanks to their deep AI expertise and massive user data pools.
Data, Trust, and the Future of AI Shopping
The growing role of AI in shopping raises critical questions around privacy and data ownership. Google, for instance, plans to refine consumer profiles based on search behavior, but says users will need to explicitly authorize access to private data like emails or app activity.
Some experts warn that letting machines handle purchases may cause anxiety for users, especially given the lack of robust legal frameworks governing AI commerce.
“The next phase of e-commerce hinges on whether we can trust machines to shop for us,” said Chris Jones, CEO of PSE Consulting.
A Stepping Stone to AGI?
Experts agree that AI agents represent a transitional stage toward artificial general intelligence (AGI). These systems go beyond chatbots, executing complex tasks, integrating with diverse digital systems, and operating independently for extended periods.
“Unlike traditional assistants that simply respond to questions, AI agents can proactively complete goals and make autonomous decisions,” explained AI expert Nguyễn Hồng Phúc.
As AI agents continue to evolve, they are set to redefine how consumers discover, evaluate, and purchase products—ushering in a new era where machines might become our most trusted shopping companions.
The post AI Agents Revolutionize Online Shopping with Virtual Try-On and Smart Bargaining appeared first on free product key.
]]>The post How to Change Signature in Outlook: A Step-by-Step Guide (2025) appeared first on free product key.
]]>Why You Should Update Your Outlook Email Signature
Updating your signature ensures that:
- Your contact information is current
- Your branding stays consistent
- You’re compliant with company policies or regulations
- You can include promotional banners or social media links
Now, let’s dive into how to change your signature in Outlook for different platforms.
How to Change Signature in Outlook for Windows
Follow these steps to update your email signature in the desktop version of Outlook for Windows:
1. Open Outlook and go to the File tab.
2. Click on Options.
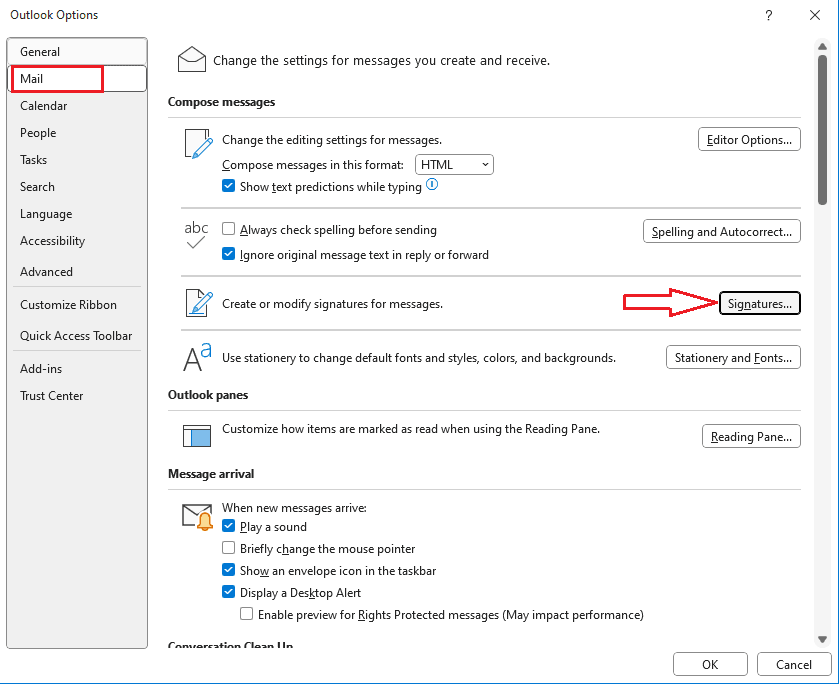
3. In the Mail category, click Signatures… under the “Compose messages” section.
4. Choose the signature you want to edit or click New to create one.
5. Use the text editor to change fonts, add images, or insert links.
6. Set the signature for New messages and Replies/forwards using the dropdown menus.
7. Click OK to save your changes.
✅ Pro Tip: You can create multiple signatures and assign them to different email accounts if you’re managing several inboxes.
How to Change Signature in Outlook for Mac
To change your email signature in the Outlook app for Mac:
- Open Outlook and go to the Outlook menu > Preferences.
- Click Signatures.
- Select the signature you want to modify or click the + icon to add a new one.
- Edit your signature in the formatting window.
- Assign the signature to your desired email account under Default Signatures.
- Close the window to automatically save your changes.
How to Change Signature in Outlook Web (Outlook on the Web / Office 365)
If you’re using Outlook in a browser, here’s how to update your signature:
- Go to https://outlook.office.com and sign in.
- Click the Settings gear icon in the top right corner.
- Select Mail > Compose and reply.
- In the Email signature section, update or create your signature.
- Choose whether to automatically include the signature in new emails and/or replies.
- Click Save at the bottom of the page.
🌐 Note: Outlook Web and the Outlook app don’t always sync signatures, so you may need to update them separately.
How to Add Images or Logos to Your Signature
Whether you’re using the desktop or web version:
- Use the formatting toolbar to insert an image (usually represented by a picture icon).
- Make sure your image is optimized for email (typically under 100KB).
- Use a hosted image URL if the upload feature is not available on your platform.
Common Issues When Changing Signatures in Outlook
- Signature not showing up? Ensure it’s selected for new messages or replies.
- Formatting issues? Stick to standard fonts and test your signature across devices.
- Image not displaying? Use web-hosted images and test them outside your network firewall.
Final Thoughts
Knowing how to change your signature in Outlook is a small but powerful way to enhance your email professionalism. Whether you’re updating contact info, adding your new job title, or refreshing your branding, Outlook gives you flexible tools to make a great impression.
Don’t forget to check how your signature looks by sending a test email to yourself!
FAQs
Q: Can I have different signatures for different accounts in Outlook?
A: Yes, Outlook allows you to set unique signatures per email account.
Q: Does Outlook sync signatures across devices?
A: Not always. Outlook desktop and web may require separate configuration.
Q: Can I use HTML in my Outlook signature?
A: Yes, you can copy and paste HTML-formatted signatures, but compatibility varies by version.
Ready to update your email signature?
Follow the steps above and give your email communication a professional upgrade today!
The post How to Change Signature in Outlook: A Step-by-Step Guide (2025) appeared first on free product key.
]]>The post How 24/7 Broadcasts Help Small Businesses: Cases and Strategies appeared first on free product key.
]]>Why 24/7 Broadcasting Matters for Small Businesses
For small businesses, visibility is currency. 24/7 broadcasting provides a low-cost, high-impact way to stay in front of customers, generate engagement, and build trust.
Key benefits include:
- Increased exposure: Your brand can be discovered by users in different time zones and browsing habits.
- Passive engagement: Live streams can play in the background, maintaining mindshare even without active interaction.
- Automation potential: Pre-recorded content loops mean you don’t need to be “live” all the time.
- Boosted credibility: Consistent presence builds trust and authority.

Case Studies: Small Businesses Using 24/7 Streams
1. Crafts & Handmade Goods – “Etsy Seller Studio”
A small artisan shop began broadcasting their crafting process 24/7 on YouTube. While they were only live a few hours a day, they looped high-quality, pre-recorded footage of their workbench and packaging process the rest of the time. Viewers were fascinated by the behind-the-scenes view and left comments, which the owner responded to during business hours.
Result:
- 3x increase in Etsy visits
- 2x growth in Instagram followers
- 25% increase in conversion from casual browsers
2. Pet Supplies Boutique – “Paws Live Lounge”
This small pet boutique set up 24/7 livestreams of adorable animals (borrowed from local shelters) playing with their toys and beds. Product links were displayed on-screen with QR codes and captions.
Result:
- Average view time over 15 minutes
- Significant boost in impulse purchases
- Community engagement led to partnerships with shelters and influencers
3. Coffee Roaster – “Brew Live”
A micro-roaster in Oregon created a 24/7 stream featuring their coffee roasting, brewing techniques, customer interviews, and even quiet café ambiance. It attracted coffee lovers who enjoyed the vibe and shared the stream with others.
Result:
- International orders increased
- YouTube monetization added a secondary income stream
- Built a dedicated niche audience of home baristas
Strategies for Success in 24/7 Streaming
1. Mix Live and Pre-Recorded Content
You don’t have to be live all the time. Use scheduled live sessions for Q&As, tutorials, or promotions, and fill the rest of the time with loops of product use, customer testimonials, or aesthetic ambiance.
2. Use Overlays and Captions
Keep promoting your brand with on-screen graphics that:
- Highlight products and prices
- Display website/QR codes
- Encourage newsletter sign-ups or social follows
3. Incorporate User-Generated Content
Feature content from your customers—reviews, unboxings, how-tos—which builds trust and adds authenticity.
4. Leverage Chatbots and Moderation Tools
Set up auto-moderation and bots to respond to frequently asked questions, or notify you when engagement spikes.
5. Optimize for Discovery
Use SEO-friendly titles, tags, and thumbnails. Livestreams often rank high on YouTube and other platforms if maintained well.
Use Gyre to Launch 24/7 Streams Easily
A powerful way to launch and manage endless 24/7 streams is by using tools like Gyre. Gyre allows small business owners to stream pre-recorded videos to platforms like YouTube, TikTok Live, and others without needing any special hardware or constant monitoring.
With Gyre, you can:
- Upload your videos and schedule them to loop continuously
- Stream simultaneously to multiple platforms
- Add overlays, intros, and breaks to keep things dynamic
- Automate your entire 24/7 broadcast process
For small teams or solo entrepreneurs, Gyre removes the technical complexity and makes professional, always-on streaming accessible and affordable.
Final Thoughts
24/7 broadcasting isn’t just for big brands or influencers—it’s a powerful tool that small businesses can harness to grow organically, connect with wider audiences, and deepen customer loyalty. Whether you’re selling coffee, crafts, or cute pet gear, creating a smart, consistent streaming strategy can transform your business into a 24/7 brand presence.
The post How 24/7 Broadcasts Help Small Businesses: Cases and Strategies appeared first on free product key.
]]>The post How to Change Your Name on Facebook appeared first on free product key.
]]>Why You Might Want to Change Your Name on Facebook
There are several reasons someone might want to update their Facebook name:
- Marriage or divorce
- Gender transition
- Correcting a misspelling or typo
- Using a middle name or nickname
- Rebranding or professional updates
Whatever the reason, Facebook makes the process fairly straightforward—if you know where to look.
Step-by-Step: How to Change Your Name on Facebook (Mobile & Desktop)
Step 1: Log in to Facebook
Make sure you’re logged in to the account where you want to change the name.
Step 2: Go to Settings
- On desktop: Click the downward arrow in the top right corner and select Settings & Privacy > Settings.
- On mobile: Tap the three horizontal lines (Menu) > Settings & Privacy > Settings.
Step 3: Open Accounts Center
Facebook has integrated many of its profile settings into the Accounts Center. Click or tap Accounts Center to continue.
Step 4: Select Your Profile
In the Accounts Center, tap on Profiles, then select the profile you want to edit.
Step 5: Edit Your Name
Tap Name and enter your new name. You’ll be able to change:
- First name
- Middle name (optional)
- Last name
After entering the new name, tap Review Change.
Step 6: Confirm the Change
Select how your name will appear (Facebook gives you a few formatting options). Then, enter your Facebook password to confirm the change and tap Save Changes.
You can watch this video to know how to change your name on Facebook:
Important Facebook Name Change Rules (2025)
Facebook has strict guidelines about name changes:
- No symbols, numbers, or unusual capitalization
- No offensive or suggestive words
- Must match the name on your ID (if requested)
- You can only change your name once every 60 days
Make sure your new name complies with Facebook’s name standards.
What If You Can’t Change Your Name on Facebook?
Sometimes, users encounter issues such as:
- The name change option not appearing
- Getting an error message
- Being locked out due to frequent changes
Solutions:
- Double-check you’re using the latest version of the app
- Try changing your name from a desktop browser
- Wait for the 60-day limit to reset
- Contact Facebook Support if necessary
Frequently Asked Questions (FAQ)
Q: Can I use a nickname instead of my full name? A: Yes, as long as it’s a variation of your real name. Facebook may ask for verification.
Q: How often can I change my name on Facebook? A: Once every 60 days.
Q: Will my friends be notified when I change my name? A: Your name will simply update on your profile, but no notification is sent out.
Final Thoughts
Changing your name on Facebook is easier than ever, thanks to the 2025 update to the Accounts Center. Just follow the steps above, and you’ll be able to reflect your true identity on your profile in no time.
The post How to Change Your Name on Facebook appeared first on free product key.
]]>The post Free Text to Video AI: Revolutionizing Content Creation appeared first on free product key.
]]>What is Text to Video AI?
Text to video AI refers to software that uses natural language processing (NLP), computer vision, and generative models to convert written descriptions into dynamic video content. Users input a prompt like “A peaceful sunset over a mountain lake,” and the AI generates a corresponding video clip—complete with visuals, animations, and sometimes even sound.
These tools are built on cutting-edge generative AI models such as Sora by OpenAI, Runway Gen-2, Pika Labs, and Synthesia. They blend deep learning and creative design to automate the traditionally complex and time-consuming video production process.

Popular Free Text to Video AI Tools
Here are some free or freemium platforms making waves:
1. Runway ML (Gen-2)
- Features: Text-to-video, video editing, image-to-video.
- Free Tier: Includes limited generations per month.
- Strengths: High-quality cinematic results and user-friendly interface.
2. Pika Labs
- Features: Realistic video generation from text or images.
- Free Access: Available via Discord; offers credits for free usage.
- Strengths: Fast generation and strong community support.
3. Kaiber
- Features: Turns text prompts into animated videos.
- Free Tier: Trial with limited output minutes.
- Strengths: Geared toward music videos and creative storytelling.
4. Synthesia
- Features: Avatar-based AI videos, often used for business tutorials.
- Free Access: Limited demo video creation.
- Strengths: Ideal for corporate training, education, and presentations.
5. DeepBrain
- Features: AI avatars that speak your scripts.
- Free Tier: Limited video duration.
- Strengths: Realistic speech and face syncing.
Benefits of Using Free Text to Video AI
- Accessibility: No expensive equipment or software needed.
- Speed: Create videos in minutes instead of hours or days.
- Creativity: Brings ideas to life with minimal effort.
- Cost-Effective: Ideal for startups, educators, and independent creators.
Limitations to Keep in Mind
While impressive, free AI video tools do have limitations:
- Watermarks: Often included in free versions.
- Video Length: Usually capped at 10–30 seconds.
- Accuracy: AI may misinterpret abstract or complex prompts.
- Quality: May not match professional-level output without paid upgrades.
The Future of Text to Video AI
As AI models continue to evolve, the quality, speed, and realism of generated videos are improving rapidly. Tools like OpenAI’s Sora, currently in limited access, show the future potential of generating full-length, high-definition videos from just a few lines of text.
Soon, we may see a world where anyone can create an entire movie, marketing campaign, or educational course using only their imagination and a text prompt.
The post Free Text to Video AI: Revolutionizing Content Creation appeared first on free product key.
]]>The post AOMEI Cyber Backup – A Professional Tool for Business Backup Solution appeared first on free product key.
]]>Why Businesses Need a Reliable Backup Solution
Business backup solutions can provide you with the following:
Data Protection and Security: A robust backup solution ensures that a secure copy of important data is available in the event of a threat to the organization that prevents access to the data.
Business Continuity and Disaster Recovery: Any disasters and failures can cause business interruptions that can have an impact on your organization, and having a good backup solution in place ensures that data is recovered quickly and downtime is minimized.
Cost Savings: A reliable backup solution reduces the risk of costly interruptions in the event of a data threat that could result in data loss and financial loss.
AOMEI Cyber Backup for Business Backup Solutions
AOMEI Cyber Backup is a professional and reliable free backup tool that simplifies data protection while ensuring business continuity, providing comprehensive features for businesses. It focuses on easy server backup, ensuring business continuity and supports multiple backup solutions, including system backup, disk backup, file backup, and virtual machine backup.
AOMEI Cyber Backup helps you protect your valuable data easily with these features:
Centralized Backup Management: You can manage multiple hosts and virtual machines from a single interface, which can simplify operations and improve efficiency.
User-friendly Interface: Its intuitive and simple interface can make it easy for even less technologically savvy users to get started and quickly complete complex backup tasks.
Agentless Backup: It improves the efficiency of the backup deployment process by creating image-based backups of entire VMware virtual machines without having to install an agent on each virtual machine.
Instant VM Recovery: Reduce business-critical downtime by quickly restoring VMware to a normal state in the event of a VMware crash.
Comprehensive Backup Options: You can create full, incremental, and differential backups, enabling users to select the backup strategy that best fits their needs.
Multi-destination Backup: It supports local storage, network-attached storage (NAS), external hard drives, and cloud platforms.
Enterprise Data Backup Best Practice with AOMEI Cyber Backup
You can follow these practices to back up your business data using AOMEI Cyber Backup.
Practice 1. Deploy Enterprise Network Backup Software for All Workloads
Log in to AOMEI Cyber Backup to deploy its agent program to all workloads (Windows PCs, servers, databases, etc.) you want to back up and get control over them. Also, you can add agent workloads to different groups and apply different backup schemes.
📌Tips: If you are looking for VM backup, you don’t need to deploy agents, please skip to practice 2.
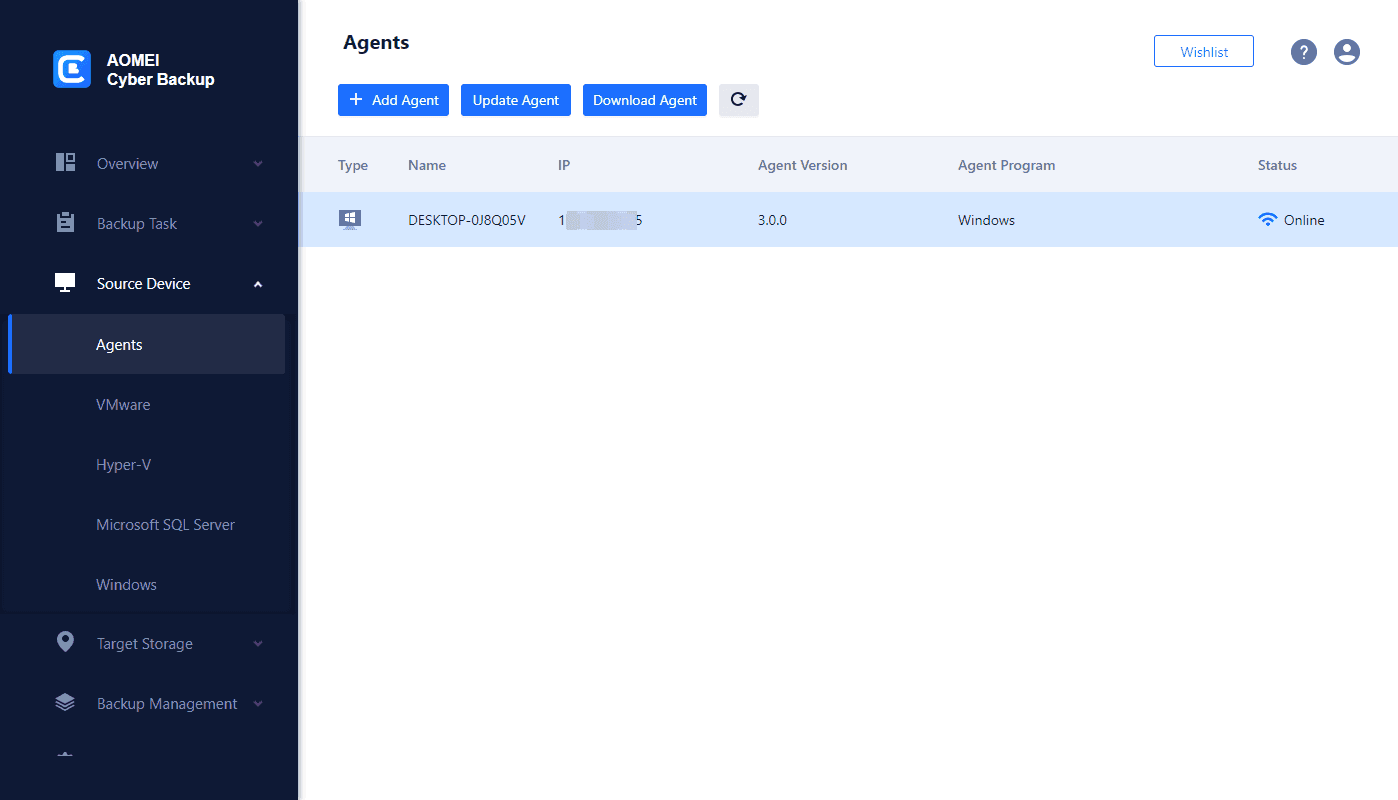
👉Navigate to Source Device > Agents, and you can choose Add Agent or Download Agent to install the AOMEI Cyber Backup agent remotely or locally.
●Add Agent: Enter the IP address and login information for the proxy, and then click Confirm to add the proxy.
●Download Agent: Click Download Agent to download the agent file. Move and install it on the client machine.
Practice 2. Setting Up Scheduled Backup Tasks with Continuous Data Protection
1. Navigate to Backup Task > + Create New Task, and you can select Backup Type from VMware ESXi Backup, Hyper-V Backup, Microsoft Backup, Disk Backup, or File Backup. Then set the Task Name, Device, Target, Archive, and Schedule.

Device: Choose workloads that need to be backed up.
Target: Select the destination for saving the backup. You can save the backup to a local path, external hard disk, network share, or NAS drive.
Schedule: You can choose to perform full, incremental, and differential backups and have them performed automatically on a daily, weekly, or monthly basis at a specified frequency.

2. Click Start Backup and select Add the schedule and start backup now, or Add the schedule only.

Practice 3. Perform Enterprise Data Recovery Flexible
After creating and executing a backup task, data recovery must be considered.
Go to Backup Task to locate the task you want to restore and click … > Restore.

For enterprise continuity, you can perform instant recovery.
Navigate to Task > + Create New Instant Recovery, and you can choose Restore from task or Restore from local path.

Conclusion
Having a reliable enterprise backup and recovery in place for your organization ensures data security and business continuity, and AOMEI Cyber Backup is a professional, powerful, and user-friendly backup solution. Whether you want to protect servers or virtual machines, it offers a variety of options to meet your organization’s backup needs.
The post AOMEI Cyber Backup – A Professional Tool for Business Backup Solution appeared first on free product key.
]]>The post Why Digital SIMs Are the Best Choice for Tourists in Korea appeared first on free product key.
]]>


